Firelord: A Guide To My Favourite Childhood Game
When I was 10, there was one special computer game that I played through several times a week — sometimes almost daily. The game was Firelord.
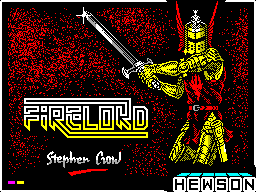 |
| Firelord’s title screen, shown while loading from casette tape. |
Firelord is a 1986 game for the Sinclair ZX Spectrum computer, written by Stephen Crow, and published by Hewson Consultants Ltd. It is an arcade adventure game, in a medieval fantasy setting, where you explore a huge map. You play the hero, Sir Galaheart, who tries to save the kingdom of Torot from the evil queen’s curse. The graphics are unusually colourful given the Spectrum’s strange hardware limitations, and the game is unusually complex.
Firelord and Me
I used to play this game a lot around 1988, and became quite proficient at it. Indeed it is a very good game, probably one of the best ever made for the ZX Spectrum computer. Incidentally, the Commodore 64 version of Firelord was actually very different, and in my opinion quite bad — the controls were sluggish and the graphics were mushed up.
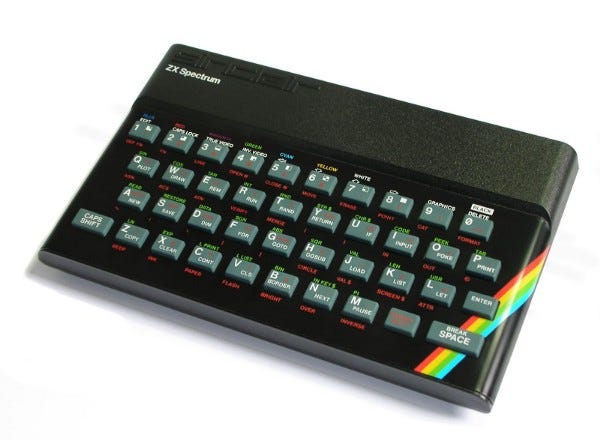 |
| The Sinclair ZX Spectrum 48K computer, with its famous (or infamous?) rubber keyboard. |
One of my friends and I were expert players. We used to be able to finish the game in around fifteen minutes in the morning, before we went to school. I’ll list our strategy in the Walkthrough below. Such a quick playthough, however, requires lots of practice at stealing items and information, and you must know most of the important game mechanics and Timescape spells for teleportation.
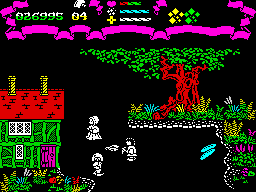 |
| Sir Galaheart, two ghosts, and some food that restores health. |
Learning the game from scratch, with only the information in the official manual, would take quite a long time and many attempts.
Making My Own Map
Many years later, I found some good ZX Spectrum emulation software for modern computers, rediscovered Firelord, and decided to completely map out the game on graph paper. I later translated my drawing into a computer image using Deluxe Paint 2 for MS-DOS, which is not as good as the Amiga version 😢 but it did work.
Some other people have drawn maps too, and the coolest one is probably by Miguel García Díaz, who pasted together all 500+ screenshots into a huge picture and added some additional information. However, I think mine is clearer and more useful as a reference, and it gives you a good overview of the game world structure.
Here is my own Firelord map, where every square represents one game screen:
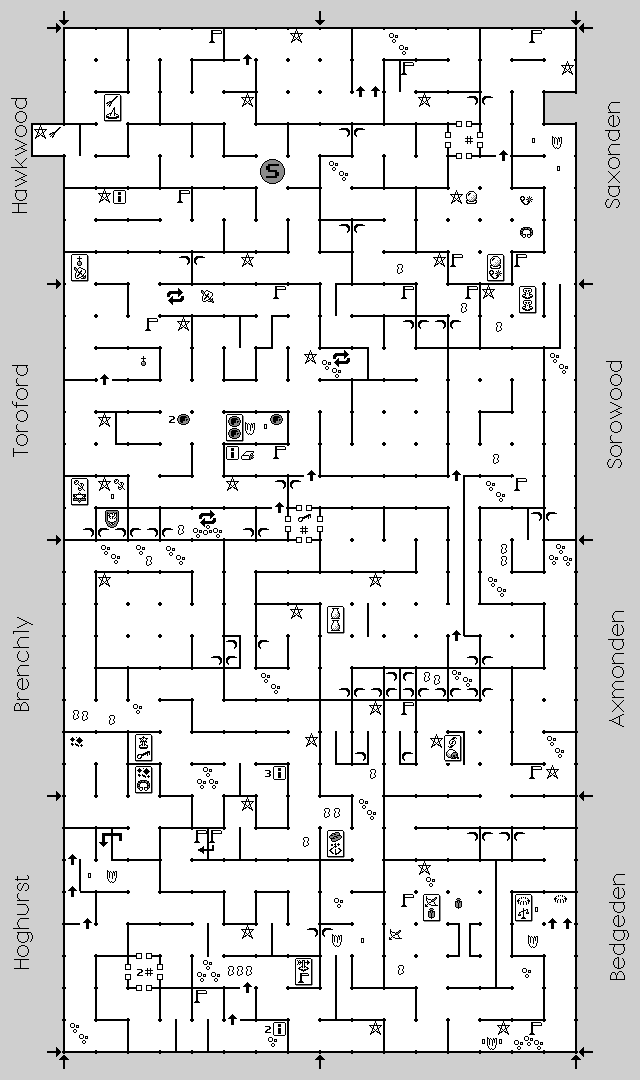 |
Map for Firelord, created by me (Fredrik Mellström). |
- (S) is the starting point.
- [i] are shops that sell information.
- The stars ☆ are shops that sell Timescape spells.
- The double arrows 🔁 are tithe houses.
- The portcullis # tiles are toll houses with gatekeepers.
- Other items on the map represent shops that sell those items.
- The rectangles with symbols are Magic places. Use the symbols with a Timescape spell to teleport there.
- Arrows pointing upwards are one-way passages, usually a frozen flame.
- The little pairs of arcs are caves, which will transport you East or West.
- The blobs are dangerous enemies. The little three-dot sprites are crystal thieves. Be careful on these screens!
- The street signs are shops that tell you where you are on the map. They’ll say something like “The East wick of South Saxonden”.
My Game Hints
First, please read the official game manual. However, there’s a whole bunch of game mechanics and secrets that you have to figure out for yourself. If you do not like spoilers, or you want to play Firelord the hard way, you may want to stop reading here.
Game Basics
- The ghosts are annoying, but you need to learn to deal with them efficiently. Dodge the ones you can, without losing any health. Dispel the ones you can’t dodge with one shot each, to preserve weapon energy.
- The blobs move randomly, so they can be dodged sometimes. They take 5 shots to kill.
- Exploring the cursed Kingdom of Torot is a game of attrition. Without bonus pickups such as food and weapons, you will eventually run out of health and firepower just by walking around.
- In places you might return to, such as the city of Toroford, or near the Princess and Queen, it may be wise to leave some bonus pickups, to save them for later.
- If you see a portcullis or a frozen flame, you can bounce into them to turn them into flashing (flickering) flames, which you can then walk past. When you do this, you need to bounce into them very quickly and back off instantly, or you’ll be killed by the flame!
- There are little coloured switches on the map that go “chink!” when you walk below them. The switches make fires and portcullises flash on the next screen. To be more specific, the switches take effect the very next time Sir Galaheart enters or appears on a map screen.
Crystals
- Having at least one crystal in your inventory enables you to fire shots, which depletes your weapon energy.
- Some places in the Kingdom of Torot are more likely to have crystals lying around than others. There are usually two or three crystals close to your starting location, in Hawkwood and Saxonden, and you can find the occasional crystal in Sorowood or Axmonden.
- There is also a Herbalist who trades crystals in South-West Brenchly. The spell crystal and bracelet takes you there.
- You may accidentally bump into a weapon thief (the crystal-like monsters) if you’re not paying attention, and if you only had one crystal, you’re in trouble. I always carry two crystals just to be on the safe side.
Trading And Stealing
- Stealing is a skill you need to master. I can hardly imagine the difficulty of getting anywhere in this game without stealing everything. Indeed, I think it would be almost impossible to beat the game, since there are simply too few items lying around on the map. And you would have to walk around rather than stealing spells, which would take forever, so you would run out of lives and weapons. It might be an interesting challenge, perhaps.
- The Princess Eleanor is your friend — she lets you steal spells and items even when she’s looking at you.
- Have many tradable items in your inventory to make stealing easier, since you need less cursor movement. When you pick up several charms (or the Firestone) stealing becomes more difficult. For this reason, I rarely carry more than two charms at a time. Some characters charge two or even three items for trading, at which point the order of items in your inventory starts to matter when you carry charms.
- If you are out of bartering energy, but have plenty of extra lives, you can run into the ghosts who look like priests to convert health into bartering energy. Shoot any other ghosts first to be safe!
- The Wizard in Hawkwood sells trading tokens, which you can steal, of course. So theoretically, as long as you keep stealing trading energy, you could stay in his house for a long, long time. Or you could go here to fill up.
Extra Lives
- Get as many extra lives as you can early in the game, while the going is still easy; you’ll probably need them later.
- When you encounter the cycling bonus pickups, you usually want to choose the extra life. To time it right, remember that in the cycle the head icon appears directly after the wide trading token icon.
- In the city of Toroford, near the two extra lives magic place, there are Reeves who sell extra lives. The West Reeve charges two items, is pretty impossible to steal from, and really devours your bartering energy. The East Reeve is better, though, but getting past the permanent fire is tricky.
- To reach the Reeve in Eastern Toroford, first hit the switch outside the Princess, and then steal a Timescape spell from her. Now the fire will flash, and you may walk past it to the Reeve’s house.
Gatekeepers and Tithe Houses
- Gatekeepers charge for passage through their toll house, to map tiles in different directions. This lets you reach some parts of the world map that you can’t walk or teleport to.
- There are three Gatekeepers. The one in Toroford is also a trader, and sells keys. The one in Hoghurst will charge you two items for passage.
- Tithe ward keepers let you store items from your inventory, for free, and retrieve the items later.
- There are three tithe houses, in Toroford and West Sorowood. The one near the queen is where you’ll want to leave the charms, until you have found all four of them. The other two may actually have some items you can take from them for free.
- Most tithe houses have weapon thieves (crystal-like monsters) nearby. You can leave all your crystals, then harmlessly dispatch the thieves by walking into them, and then get your crystals back again.
Finding the Charms
- To beat the game you need to find all 4 charms, take them to the evil queen to get the Firestone, and then take the Firestone to the Dragon.
- Rather than looking around blindly for the charms, you should trade or steal information. There are 4 charms, and thus also 4 information brokers.
- There are two or more of most characters in the game, even those who offer items for trade! This can be confusing, for instance when your information says to pick up a charm at the Knight’s house. Which knight? To distinguish them, they have different colours. The colour is shown on the ribbons on the sides of the screen, both when you visit their houses, and when you recieve the information.
- The Knight in Bedgeden who sells crossbows has yellow ribbons. The Knight in Toroford who sells sword and shield is white.
How To Find the Dragon
- Once you’ve found the dragon, and you know the Timescape spell to teleport there, it’s easy. Getting out of there is also simple.
- But if you were playing the game for the first time, and you don’t have the spell, it is very difficult to walk East to the Dragon in Bedgeden. To discover the way, you would have to make some sacrifices!
- To pass the fire on your way East to the dragon, hit the switch, and kill yourself in the fire. The fire will start to flash, so you can walk past it.
- On your way back West, simply hit the other switch, and enter and exit the Herbalist’s house, to get the fire flashing.
- There’s no way of getting past the weapon thieves on your way East without letting them steal one crystal, so bring at least two.
- On your way back West, simply enter the cave, and you’ll exit through the Peasant’s house on the other side.
Bugs
- You can trigger an interesting bug by flipping through the spell symbols with your left and right keys, and rapidly changing direction. After a while, very strange symbols will start to show up!
- If you try to purchase information after you’ve got the Firestone, they will give you invalid answers. Obviously the four Charms have already been found, and you can’t find them again.
Walkthrough
There are two ways of ending the game. The simpler one will render you the title Overlord on the high score list, and the harder one is required to become Firelord. The difference is minor, but it took me a very long time to figure out the trick. See if you can figure it out for yourself, without cheating and reading my hints! 😊
There are several possible strategies, but I’ve found that the following way is very straightforward:
- From the starting point, go North and West to visit the Witch, but stop to pick up two crystals along the way. Steal two broomsticks from her.
- Walk to the South part of Hawkwood and visit the Wizard. Steal information from him, and steal a Timescape spell.
- Teleport into the city of Toroford (the spell is two extra lives). Walk to the Wise Old Man nearby, and steal some more information.
- With the information you now have, go get the first two items, and trade them to get the first two charms. There’s no need to steal — since you have two non-crystal items you can just trade them.
- When you’re done, Timescape to the Evil Queen and her captive Princess in South Toroford (rose and star). Walk to the tithe house and leave your two charms. Walk back to Princess Eleanor, steal two roses to fill up your inventory, and steal a spell.
- Timescape all the way down to South-East Hoghurst (arrow charm and signpost). Watch out for weapon thieves and blobs as you walk West to the Gatekeeper, and steal passage to the South or West. Note that the cost is two items, even if you’re stealing! Walk South-East into the woods and steal information from the hermit, which costs two items as well. Walk to a Herbalist (North or East) and steal a spell.
- The final piece of information is with the Bishop in South-East Brenchly (the spell is star charm and key), but I advise against you going there, for two reasons:
- Stealing from the Bishop is difficult since the cost is three items, and also he depletes your bartering energy quickly. It is good practice, but actually unnecessary, because:
- The Bishop will give you predictable information — the charm he knows about isalways in the walled-in city in South Saxonden. There are three traders; the Wizard trades crystal balls, the Reeve has leg irons, and the Herbalist carries bracelets. Try each of these items with the other two traders — at most six different possibilities — and you will find the charm.
- Go get the final two charms. To speed up the trial and error method I described in paragraph 7, I recommend that you get the charm from the city in South Saxonden first, while you have free inventory slots. (The spell is crystal ball and leg iron.) Then get the last charm. Finally, fill up your bartering energy to prepare for the Evil Queen, since your next trip is one of the worst times to run out.
- Timescape to the Queen and Princess. Walk to the tithe house, leave your crystals and items, and bring all four charms.
- Walk back to the Queen. You now have the choice of either buying or stealing the Firestone. Stealing also needs all four items; it’s the most difficult theft in the game! Next, get your inventory back from the tithe house, and Timescape from the Princess to the Dragon in South-East Bedgeden (tooth necklace and scales).
- Enter the Dragon’s lair to beat the game. If you traded the charms for the Firestone, you get the sad ending and become Overlord, and if you stole it, you get the good ending and become Firelord.
That’s it! 😊
YouTube Walkthrough
Miguel García Díaz (zeycus) has published a video walkthrough on YouTube (part 2), which shows how to beat the game for real.
There is another Firelord walkthrough on YouTube, but I find it very annoying, since they get all the charms without purchasing any information. The item locations are randomized, so this can only be done if you cheat — starting from the same emulator snapshot every time, for example. And for this reason, the video doesn’t really teach you how to finish the game yourself!
Further resources
- Miguel García Díaz has a comprehensive Firelord guide with all of the icons and pictures you could possibly want, and a walkthrough. 😊
- The Firelord Wikipedia page has a good summary.
- The World of Spectrum has a collection of resources for Firelord, including downloadable copies of the game that you can play with an emulator. If you are looking for a good emulator, I can recommend Spectaculator.
- MobyGames has a page about Firelord.
- The Everything2 page for Firelord has some additional information.

Comments
Post a Comment